10 Essential Tips for Installing Stainless Steel Cable Tray Efficiently

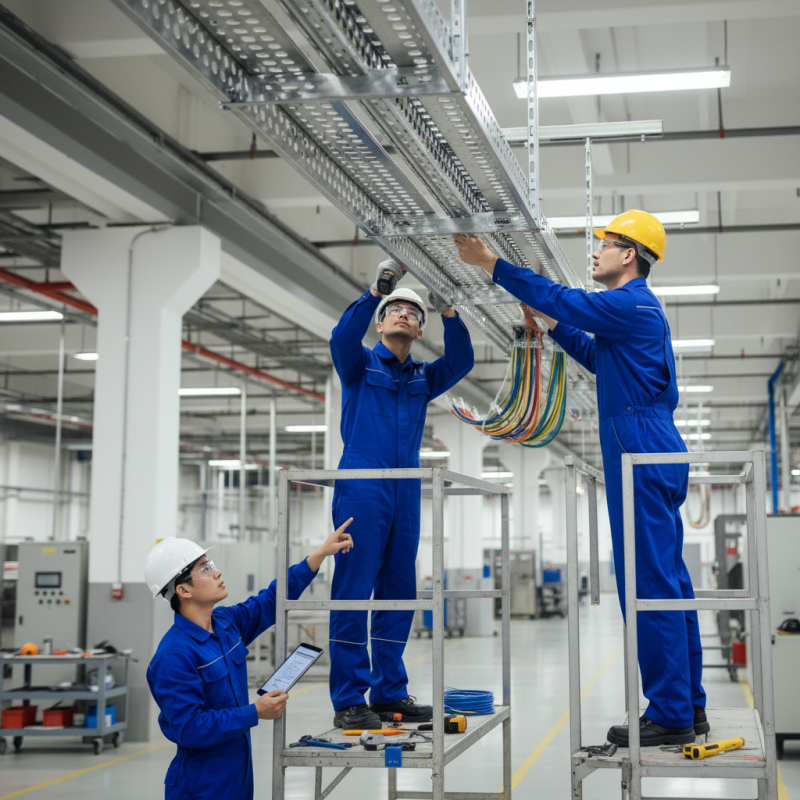
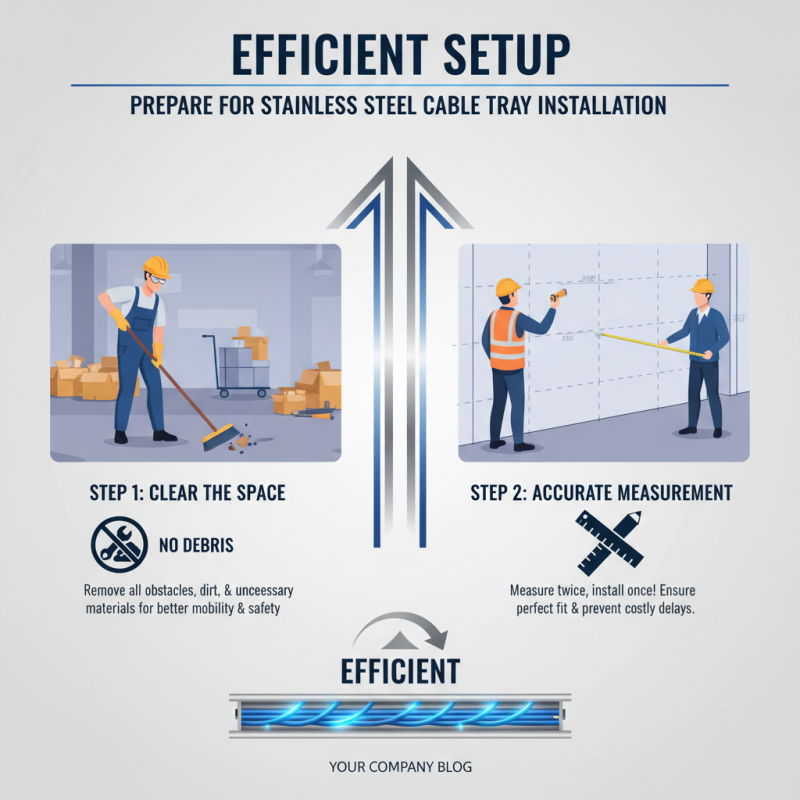
Installing a stainless steel cable tray requires careful planning and execution. This essential component organizes and protects cables in various settings. A well-installed stainless steel cable tray enhances safety and improves efficiency.

However, the process can be challenging, and mistakes are common. Choosing the right materials is crucial. Not all stainless steel is the same, and improper selection can lead to issues down the line. Pay attention to environmental factors as well; humidity and temperature can affect the tray's performance.

Proper installation techniques are vital. Taking shortcuts may save time but often results in bigger problems. Rigorous checks during the installation process can prevent complications later on. With these tips in mind, you can achieve an efficient installation that stands the test of time.

10 Essential Tips for Installing Stainless Steel Cable Tray Efficiently

Understanding Stainless Steel Cable Tray Types and Their Uses

10 Essential Tips for Installing Stainless Steel Cable Tray Efficiently

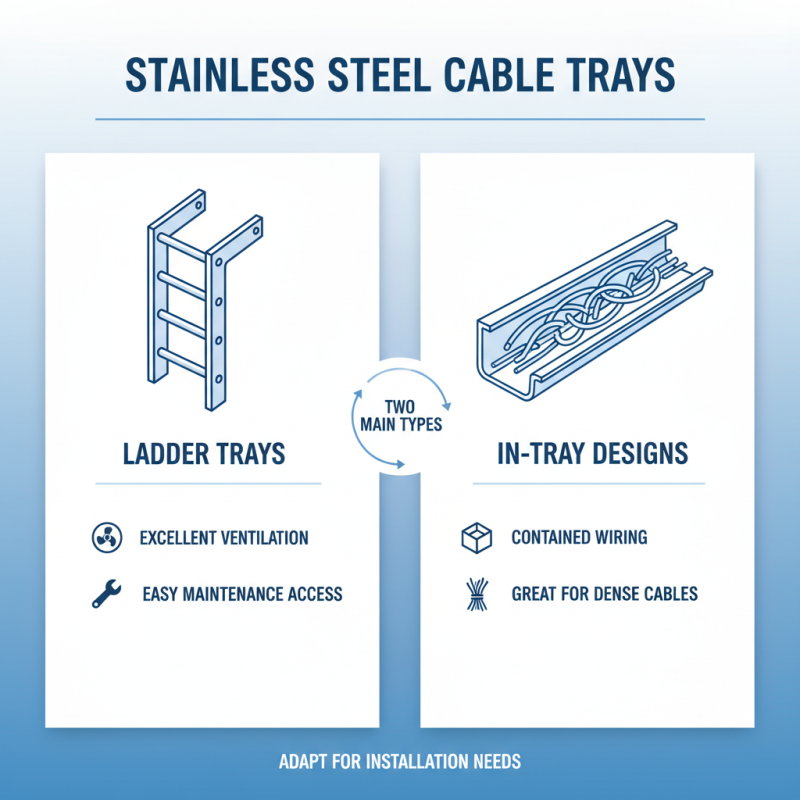
When considering stainless steel cable trays, it’s crucial to understand their various types. The two main types are ladder trays and in-tray designs. Ladder trays offer exceptional ventilation. They provide easy access for maintenance. In-tray designs, while more contained, are great for dense wiring. Both serve different needs in installation.

Selecting the right type can be challenging. Each type has distinct benefits. Ladder trays allow for easier cooling of cables. They minimize the heat buildup that can occur with in-tray designs. On the other hand, in-trays shield cables from dirt and accidental contact. It's essential to evaluate your specific wiring requirements.

User feedback often highlights installation frustrations. Incorrectly chosen designs can lead to costly adjustments later. Ensuring adequate support spacing is also crucial. A poorly planned installation can cause sagging cables. It’s worth taking the time to reflect on your choices before proceeding.

Preparing Your Installation Area for an Efficient Setup

10 Essential Tips for Installing Stainless Steel Cable Tray Efficiently

Preparing your installation area is critical for an efficient setup of stainless steel cable trays. Start by clearing the space of any debris or obstacles. A clean area allows for better mobility and prevents accidents. Measure the area accurately to ensure the trays fit perfectly. Many overlook measurements, resulting in delays later on.

Next, check the surrounding environment. Ensure there is adequate lighting for visibility. Poor lighting can lead to mistakes during installation. If necessary, bring in additional lighting sources. Also, consider the weather conditions if working outdoors. Rain or high winds can complicate the installation process.

Gather all your tools and materials beforehand. Lay them out neatly in the installation area. This minimizes time spent searching for items during the installation. However, make sure not to overcrowd the space. Too many items can create chaos and confusion. Reflect on your previous installations—identify what worked and what didn’t. Learning from past experiences will enhance your efficiency this time.

Essential Tools and Equipment for Installing Cable Trays

When installing stainless steel cable trays, choosing the right tools is crucial. Basic equipment includes wrenches, drill sets, and measuring tapes. Reports indicate that over 80% of installation delays stem from inadequate tools. A quality cable cutter and a level can prevent misalignment issues. Finding the right tools makes the entire process smoother.

Not all tools are created equal. Some cable tray installations fail due to poor equipment choices. For example, using a low-quality drill can lead to stripped screws. This wastes both time and money. It is essential to invest in equipment that meets industry standards. Proper tools can significantly reduce the likelihood of accidents on the job site.

In addition to hand tools, consider safety gear as essential equipment. Helmets, gloves, and safety glasses should not be optional. According to safety reports, around 30% of workplace injuries occur during installation tasks. Equip your team well to mitigate these risks. Quality equipment is not just a preference; it is a necessity for efficient installation.

10 Essential Tips for Installing Stainless Steel Cable Tray Efficiently - Essential Tools and Equipment for Installing Cable Trays

Tip No. Tip Title Description Essential Tools
1 Plan Your Layout Before installation, create a detailed plan that maps out the layout of the cable trays. Measuring tape, Graph paper
2 Choose the Right Tray Select a cable tray type that meets your load requirements and installation environment. Cable tray samples, Load calculator
3 Gather Tools and Equipment Make sure you have all necessary tools before starting the installation process. Drill, Wrenches, Level
4 Install Support Brackets Secure support brackets at appropriate intervals to ensure stability of the trays. Bolts, Anchors, Drill
5 Ensure Proper Alignment Verify that the trays are level and properly aligned at every step of installation. Level, Measuring tape
6 Secure Cables in Trays Organize and secure the cables neatly to prevent overcrowding. Cable ties, Lacing cord
7 Maintain Accessibility Ensure that trays are installed in a manner that provides access for future maintenance. Access tools, Ladder
8 Inspect Installation Conduct a thorough inspection after installation to ensure everything is secure. Inspection checklist
9 Document the Installation Keep records of the installation process, including diagrams and configurations. Camera, Notepad
10 Plan for Future Expansions Consider future needs and leave space for additional cables or trays if necessary. Future planning tools

Step-by-Step Guide to Proper Cable Tray Installation

Installing stainless steel cable trays efficiently requires careful planning and execution. A recent industry report indicates that proper installation can reduce maintenance costs by up to 30%. Following a structured approach is essential for success.

Tip: Always begin with a detailed layout. This step ensures alignment with electrical paths while considering cable weight. Take care when measuring distances. Even small errors can lead to significant inefficiencies.

Ensure that all necessary tools are on hand. Using the right tools can streamline the installation process. Remember to check the integrity of your cable trays, a crucial step to enhance the durability of the installation. Inadequate checks may lead to unexpected failures later, so don’t skip this step.

Tip: Use appropriate grounding techniques for safety. Grounding your cable trays helps prevent electrical hazards. Sufficient grounding can improve overall system performance. Remember, attention to detail during installation will save time and costs in the long run.

Common Mistakes to Avoid During Cable Tray Installation

When installing stainless steel cable trays, several common mistakes can lead to project delays and additional costs. One frequent issue is the lack of proper planning. Skipping this step often results in misaligned trays or insufficient support. Installing the trays before checking cable lengths can also create problems. Cables should fit snugly, not excessively strain the trays.

Another mistake is not accounting for future expansions. Always leave room for additional cables. This prepares for future needs and avoids costly revisions. Improper fastening methods can also cause issues. Tightening bolts too much can damage the tray, while loose bolts may lead to system failure. These seemingly minor oversights can have significant repercussions.

Lastly, using inadequate tools can complicate the installation. Rushing through the process often leads to flawed outcomes. Take time to review the installation method. Reflecting on these common pitfalls can lead to smoother projects in the future. Stay vigilant, and think through each step carefully.