
For over 50 years, we have dedicated ourselves to providing Industry with best in class wire management solutions and to helping solve mission critical issues.

The needs of today’s schools and universities are changing fast. When it comes to anticipating and meeting those needs, MonoSystems is in a class of its own.

For the past five decades, we’ve made it our business to offer more value to our partners, which in turn provides greater value to their customers.
Choosing the right Marble Cutting Disc can determine whether a project ends with a clean edge or a costly replacement. Marble varies in hardness, thickness, veining, and surface finish. A disc that performs well on a thin bathroom tile may struggle with a dense countertop slab. The cutting machine matters too. Wet saws, angle grinders, and bridge saws require different disc designs, arbor sizes, and operating speeds.
This guide introduces seven practical tips for selecting a suitable Marble Cutting Disc. It considers diamond quality, segment design, blade diameter, cutting speed, cooling methods, and material compatibility. These details affect edge smoothness, cutting stability, and service life. A reliable choice should match the marble, equipment, and workload rather than rely on price alone. Check the manufacturer’s specifications carefully. Verify the maximum RPM before installation. Inspect the blade for cracks, uneven wear, or damaged segments. Small checks prevent serious problems.
Experience also reveals an uncomfortable truth: skilled installers still choose poorly when they rush. I have seen a premium disc produce chipped corners because the feed pressure was excessive. Sometimes the blade was correct, but the machine was poorly aligned. No disc can repair careless setup. Dust, water flow, and operator control also influence the final result. These tips offer a practical framework, not a perfect formula. Marble behaves differently from one quarry to another. Careful testing on a spare piece remains wise. A few quiet minutes of preparation can protect an expensive stone surface.
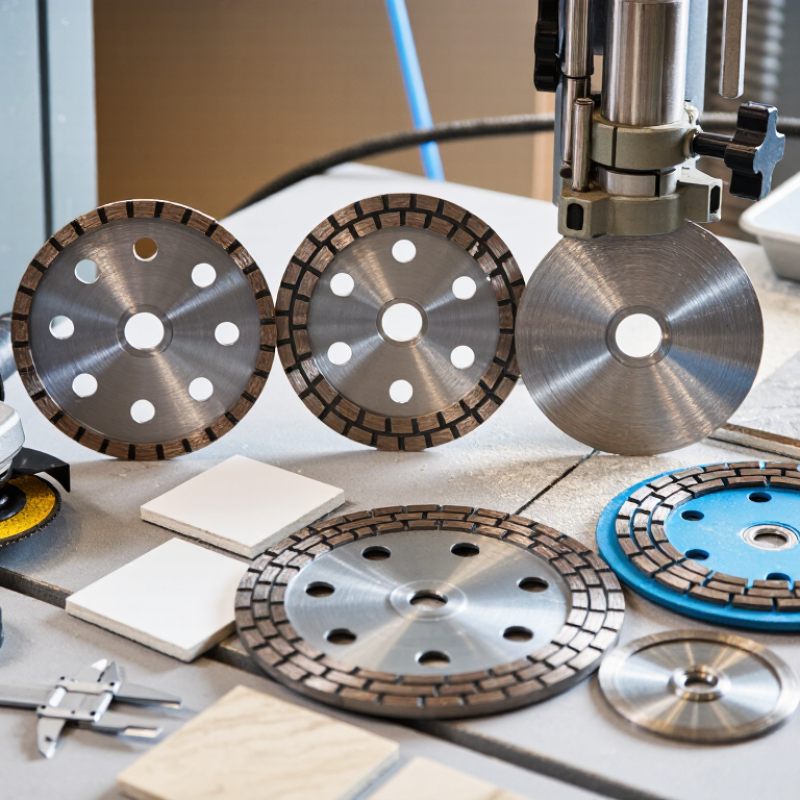
Marble is softer and more absorbent than granite, so disc selection starts with the stone, not the machine. Calcite, marble’s primary mineral, has a Mohs hardness of about 3, according to the U.S. Geological Survey. That softness makes aggressive diamond segments risky. They may chip polished edges or leave deep scratches. Natural Stone Institute guidance also stresses matching cutting methods to stone composition and finish.
Tip 1: Check the marble type first. White Carrara, veined marble, and breccia can behave differently. Inspect a hidden corner and note the cutting direction. A continuous-rim diamond disc usually produces a cleaner finish on softer marble. It also reduces visible edge damage. Do not assume every disc marked “stone” is suitable.
Tip 2: Match the disc to the cut. Thin discs suit precise trimming, while thicker discs offer better stability during deeper cuts. Cutting too quickly can heat the edge and cause discoloration. I have found that a slower, steady feed often works better, although this is easy to underestimate on large slabs. Tip 3: Control dust and water carefully. OSHA’s respirable crystalline silica standard sets an eight-hour permissible exposure limit of 50 micrograms per cubic meter. Marble dust may contain less silica than granite dust, but exposure still requires control. Wet cutting, ventilation, and suitable respiratory protection remain important. Test first. A small mistake on marble stays visible.
Choosing the right marble cutting disc starts with your cutting method and equipment. A continuous-rim diamond disc usually gives the cleanest edge on polished marble. It suits wet saws and slow, controlled cuts. For faster work, a turbo rim can remove material more aggressively, but it may leave small chips on delicate surfaces. Segmented discs are useful for rough structural cuts, not visible edges.
Match the disc diameter and arbor hole to your machine. Check the tool’s maximum RPM before installation. A disc rated below the machine speed can become dangerous. On an angle grinder, use short passes and avoid forcing the blade through a thick slab. Wet cutting helps control heat and dust, while dry cutting requires a disc specifically designed for that use. Keep the cut shallow at first. It reduces pressure on the marble.
In practical work, I mark the face, support the slab fully, and test a spare piece before cutting the finished panel. The first cut is rarely perfect. Some installers prefer a slightly slower feed because the edge stays cleaner. That choice takes longer. Still, replacing a chipped marble edge takes much longer. Inspect the rim for cracks, missing diamonds, or warping before every job. A disc may appear usable while cutting poorly, so stop when vibration or burning marks appear.
Match the disc type to your cutting method and equipment.
The practical ratings below compare common marble cutting disc types on cutting speed, edge quality, chip control, and equipment compatibility. Ratings use a 1–5 scale, where 5 indicates the strongest suitability for the listed factor.
Choosing the right marble cutting disc starts with the diamond bond, not the label on the package. Marble is usually softer than granite, so a harder metal bond can hold diamond particles longer. However, abrasive minerals and veining may change wear behavior. The U.S. Geological Survey’s Mineral Commodity Summaries 2024 reported roughly 1.8 million metric tons of U.S. dimension stone production in 2023, showing the scale of material variation faced by fabricators. One bond cannot suit every slab.
For clean edges, select a continuous-rim or closely spaced segment design. It supports smoother cutting and reduces corner chipping, especially on vanity edges and narrow strips. A turbo segment may remove dust faster, but its deeper gullets can leave a rougher finish. Natural Stone Institute technical guidance emphasizes matching tool selection with stone hardness, thickness, cooling, and operating speed. Use steady water flow. Keep the feed rate controlled. Too much pressure can glaze the bond and burn the marble.
A practical test cut is essential. Inspect the kerf after 300 to 500 millimeters. If the disc cuts slowly, the bond may be too hard. If diamond loss is excessive, it may be too soft. I have seen operators blame the disc when unstable clamping caused most of the chipping. That mistake is easy to repeat. Check the slab support, spindle runout, and machine speed before changing the segment design.
| Tip | Selection Dimension | Recommended Choice | Why It Works for Marble | Typical Specification | Practical Cutting Guidance |
|---|---|---|---|---|---|
| 1 | Match the bond to the stone hardness | Choose a medium-soft to medium metal bond for most marble grades; use a slightly harder bond for very soft, highly abrasive marble. | Marble is generally softer than granite, so an overly hard bond may polish the diamonds instead of releasing them. A balanced bond helps maintain cutting speed. | Bond selection should be verified with a test cut because marble hardness and mineral content vary widely. | If the disc becomes slow and shiny, the bond may be too hard. If segments wear unusually fast, consider a harder bond or lower cutting pressure. |
| 2 | Select the correct segment design | Use a continuous rim for the cleanest edge; use narrow turbo or segmented designs when faster stock removal and better cooling are more important. | A continuous rim supports smooth, low-chipping cuts. Gaps in turbo or segmented rims improve debris removal and airflow but can leave a rougher edge. | Continuous rim: finish cuts and visible edges. Turbo/segmented: rough cuts, thicker slabs, and higher production rates. | For premium exposed edges, make a shallow scoring pass before the full-depth cut to reduce breakout. |
| 3 | Choose diamond grit for the required finish | Use coarse grit for rapid cutting and fine-to-medium grit for smoother edges and reduced chipping. | Coarser diamonds remove material quickly, while finer diamonds distribute the cutting action across more contact points and typically leave a cleaner edge. | Common starting ranges: approximately 30/40–40/50 mesh for fast stock removal; approximately 50/60–60/80 mesh for cleaner finish cuts. | The exact grit choice depends on slab thickness, machine rigidity, marble composition, and whether the edge will be polished afterward. |
| 4 | Prioritize wet cutting for finish quality | Use a wet-rated disc with a continuous and steady water supply whenever the equipment permits. | Water cools the rim, suppresses dust, flushes marble slurry from the cut, and helps reduce thermal stress and edge damage. | Direct water toward both sides of the cutting zone; avoid intermittent water flow during a deep cut. | Insufficient water can cause overheating, glazing, uneven wear, and discoloration. Use suitable respiratory protection for dry cutting. |
| 5 | Check diameter, arbor, and machine speed | Select a disc whose diameter, arbor size, and maximum RPM are compatible with the saw or grinder. | Correct geometry prevents vibration, mounting problems, and excessive peripheral speed that can damage the disc or workpiece. | The disc’s marked maximum RPM must be equal to or higher than the machine’s no-load RPM. Never enlarge the arbor hole manually. | Inspect flanges, guards, and spindle condition before use. Stop immediately if the disc vibrates, wobbles, or produces abnormal noise. |
| 6 | Match segment width and height to the job | Use a thinner rim for precision tile and thin-slab work; use a more robust segment structure for thick slabs and demanding production cuts. | Thin rims reduce kerf loss and cutting resistance, while stronger segments provide greater wear allowance and stability in deep cuts. | Typical rim thickness is selected according to the required kerf, slab thickness, machine power, and acceptable edge tolerance. | Do not force a thin precision disc through a thick slab. Make multiple passes when recommended by the equipment and disc instructions. |
| 7 | Test the disc and control feed pressure | Run a short test cut on an offcut from the same marble batch before starting the finished piece. | A test reveals how the bond, diamond concentration, grit, and segment design react to the specific stone without risking the final workpiece. | Use steady, moderate feed pressure and allow the diamonds to cut; excessive force increases heat, deflection, and chipping. | Record cutting speed, edge quality, water flow, and segment wear. Adjust only one variable at a time for reliable comparison. |
Choosing the right marble cutting disc starts with seven practical checks. Begin with diameter, arbor size, and maximum RPM. Match the arbor exactly, or use only an approved reducing ring. A loose fit can cause vibration, chipped edges, and uneven kerfs. Keep it boring. The disc diameter must suit the guard and tool. Its speed rating must equal or exceed the grinder’s no-load RPM. Never infer safety from thickness. Larger discs often require lower operating speeds, so label data matters more than appearance.
For marble, choose a diamond disc rated specifically for natural stone and your wet or dry cutting method. Continuous rims usually produce cleaner edges. Segmented rims can cut faster but may cause more chipping. Check the recommended material, kerf width, and cutting direction. A disc designed for concrete may cut marble, but it can be unnecessarily aggressive. That assumption deserves testing. Make a short trial cut on scrap marble, then inspect the underside for breakout. Coolant can reduce heat, but water must suit the tool and electrical setup. Do not improvise here.
Dust control is part of compatibility, not an afterthought. OSHA’s Respirable Crystalline Silica Standard sets an eight-hour exposure limit of 50 micrograms per cubic meter. The UK HSE EH40/2005 guidance lists 0.1 mg/m³ over eight hours. Marble composition varies, so a safety data sheet or stone test is more reliable than guessing. Use a shroud and suitable respiratory protection when dry cutting, following local requirements. I would recheck RPM, guard clearance, and water flow before every cut. One overlooked number can ruin an expensive slab.
Tip 1: Match the marble cutting disc to the stone’s hardness and thickness. A disc designed for dense marble should cut steadily without excessive chipping. Tip 2: Inspect the rim carefully. A continuous rim often produces cleaner edges, while segmented designs may remove material faster. Choose based on finish, not speed alone. Clean cuts matter.
Tip 3: Check the disc’s diameter, bore size, and maximum operating speed before installation. A correct fit reduces vibration and improves control. Tip 4: Use suitable eye, hearing, and respiratory protection. Marble dust can spread across a workshop quickly, even during a short cut. Keep both hands stable, and never force the disc through the slab.
Tip 5: Control water flow when wet cutting. Enough water cools the rim and limits airborne dust, but flooding can hide the cutting line. Tip 6: Watch for unusual noise, wobbling, or slow cutting. These signs may indicate wear, damage, or an unsuitable disc. Stop and inspect it. Tip 7: Store the disc flat, dry, and away from impact. Small edge damage can become serious during use. From my own cutting experience, I once trusted a disc because its rim looked clean, but the finished edge was rough. The problem was poor alignment, not disc quality. This is worth remembering: long-term performance depends on the tool, setup, handling, and operator judgment.